
Having done many translation projects with Articulate Storyline, I’ve learned that not everyone is aware of the awesome Storyline feature that enables you to export and re-import all of the text in the .story file.
This feature is very comprehensive as it includes on-slide text, button labels, slide titles, notes, etc. You can imagine how much time this saves versus manually copy/pasting all that text. But even so, I’ve discovered that there’s still a lot of work that comes between exporting from Storyline and importing the translated text.
Today, I’ve put together my own checklist for all the steps, and am sharing those in hopes of saving you time (and some unanticipated headaches.)
Exporting the Articulate Storyline File
Articulate Storyline exports all text in the course into a Word document (this does not include text embedded in graphics). From here, you’ll want to get the data into an Excel spreadsheet.
Why? Because we need flexibility in what data to protect and at what level to protect it. In my opinion, Excel does this in a very user friendly way. Here are the steps I follow for efficiency and accuracy:
1. Copy/paste both of the Word columns into 2 columns in an Excel spreadsheet. Do not alter the “Id” column because this is how Storyline knows where to put the translated text when you import it back into the course. You can, however, change any of the text in the “Translate this column” section.
You might do this if you notice some typos or if you simply want to reword something before having it translated. Also, you’ll notice the columns have a grey fill. This is helpful because if you have white text in the course, without the grey fill, you wouldn’t be able to see it.
2. Now we need to add slide animation cues. These are symbols in the narration text that help us know where to sync the animations to all text in column 2 that came from the ‘Notes’ field in Articulate Storyline.
When you send the spreadsheet off for translation, you will want to ask the translator to add these same animation cues to the translated text so you can resync the audio once the text has been imported back in to Articulate Storyline.
Remember, you probably won’t speak the new foreign language and you’ll need some way to know where the animations go. The character you use as your cue should be something that is not used elsewhere in the text – something that you can find (Ctrl+F) and delete from the spreadsheet at once. Double number signs (##) are usually a good option.
3. Next, copy/paste the text from column 2 into a third column, and then immediately use the Clear Contents option on the third column. This formats each cell in that third column to the correct font type, size & color.
This is the column that the translator will type the translated text into. This step is very important because when Articulate Storyline imports text back in, it uses whatever font characteristics are in the import file. Therefore, this simple steps lets us avoid manually formatting every single cell in the column after it’s been translated and before you import it back into Storyline.
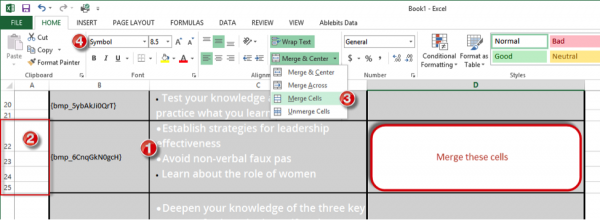
4. Merge extra cells. You’ll notice in Excel thatsingle “cells” from Word that had any line breaks like paragraphs or bullet-points (see 1 below) have created multiple cells in Excel (see 2 below.)
In this third column, you need to merge all of those extra cells (all cells between the dark black lines) back into one, so that you have one Excel cell for every Id in column 1. Make sure you use the Merge Cells command (see 3 below). Do not use Merge & Center or all of your text will be centered when you import the translated text back into Articulate Storyline.
5. Now, for some formatting clean up. Any cells in column 2 that have a bullet as their first character will cause the corresponding cell in column 3 to have “Symbol” as its font type (see 4 above).
If we don’t change this, when the translator types into this cell, the text won’t make any sense. Resolving this is a two-step process. Step one is to change the font type in the cells in Column 3 to the same font as the text following the bullet in the cells in column 2.
Step two is to create a custom text format that includes bullets so when the translator types into this cell, the bullets automatically appear. Instructions to do this can be found in Microsoft’s online support. Once you create this custom text format, you can then use the Format Cell command to apply this to all cells in column 3 that need bullets.
6. Lastly, you want to lock down columns 1 & 2. This prevents anyone from accidentally changing/deleting information in those columns. Then protect the Sheet. Protecting the sheet locks the cell format in column 3, ensuring that the translated text is typed in the appropriate font type, size & color (you can also find instructions for doing this online).
Note: If any cells in column 2 have multiple font types, sizes & colors, column 3 will be formatted into whatever the first character’s formatted style is in column 2.
Requesting & Preparing Translated Text
At this point, you are ready to send the spreadsheet out for translation. Don’t forget to let the translators know to add the animation cues shown in column 2 to column 3. Note: Graphics with embedded text are not included in the export from Articulate Storyline. You’ll need to document those individually by doing an inventory on every slide, and including those in the Excel spreadsheet that you send to the translator.
7. Review. Once you’ve received the translation back, have your client review/edit the translation before importing it into the course, sending it out for narration, or requesting replacement graphics. Don’t get in a hurry and skip this step because trying to edit foreign text yourself is very time consuming, and ordering audio retakes is expensive.
8. Once your client has had the opportunity to tweak the translation where needed, unprotect the excel spreadsheet. Make any needed edits to the translated text in column 3, namely adding back any formatting that would have been affected in step 6.
Make a second copy of the Excel spreadsheet. Remove all animation cues from one copy, and then copy/paste the ID column (column 1) and the translated column (column 3) from this copy of the Excel spreadsheet into Word and save it. Do not copy the English column. Hold onto the other Excel copy with the animation cues. You’ll need that when you are ready to resync the course.
Importing Back into Articulate Storyline
9. Now you’re ready to import the Word document into Storyline. Make a copy of your original Articulate Storyline file first so that you don’t overwrite it with the translated text. Then import the Word document into the duplicate Storyline copy.
If the word document that you just created doesn’t show up as an available import item, you may not have saved it in the correct Word version. It takes just a few minutes for all the text to populate in Storyline. Due to the differences in word length between languages, you may need to adjust on-screen text placement and/or font size.
10. And finally, once your translated audio has been received, use your Excel spreadsheet with the animation cues to sync the course, and change out any graphics that needed translation.
Using this checklist when translating a course in Articulate Storyline will save you a lot of work and stress. Feel free to print it out and reference it the next time you need to translate—you’ll be glad you did.