A while back, we talked about how to partially restrict navigation when using a custom menu. Partial restriction for that example simply means requiring the user to, at minimum, click through each slide included in a menu topic before being able to move on to the next menu topic.
Today, we’re going to talk about how to also require the user to view each slide, and its layers, in their entirety.
Please note, we DO NOT advocate this approach for most courses. Frankly, your users will be annoyed if you lock everything down in every course. However, some clients want (or require) that users view all the content. This is the use case for the rest of this article.
If you haven’t viewed the previous post, it might be a good idea to start there. The source file for this post has been included if you’d like to download it.
Fully Restricting Navigation
Storyline 360 includes the ability to accomplish what I’ll call full restriction of the navigation by using 2 built-in features, combined with the use of variables and triggers.
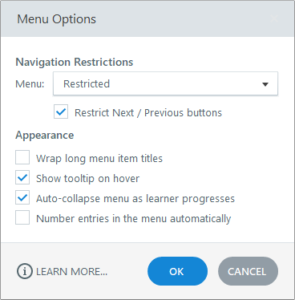
Feature One: By setting the Menu to Restricted and checking the Restrict Next / Previous buttons box shown below, you can disable the Next button until the timeline ends on the base layer. This setting works on every slide in the course whether you use the built-in menu or a custom menu.
Feature Two: The second step to full lock down is making the Seekbar read-only. This lets the learner view the slide progression via the Seekbar, without giving them the ability to fast forward to the end of the slide. To accomplish this, change the Seekbar drop-down to “Seekbar is read-only.”

The steps above work great if your course doesn’t have layers, but what if it does? If the layers include important information that the learner must see, then we need to go through a simple process for every slide that includes layers.
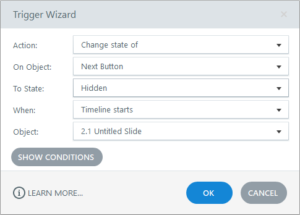
First, add a trigger to the base layer to change the state of the Next button to hidden or disabled, whichever you prefer, when the timeline starts.
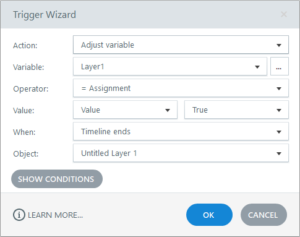
Next, create a new variable for each layer on this slide, and set each to False. For this example, our slide includes 3 layers.
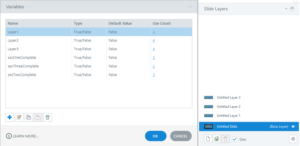
Now, add a trigger to each layer to change that layer’s variable to true when the layer timeline ends, if the layer has audio. If the layer does not have audio, change the variable to true when the layer timeline starts.
Finally, add a trigger to each layer that changes the state of the Next button to Normal when the layer timeline ends (or starts, depending on what you used above), if all of the layer variables are True.
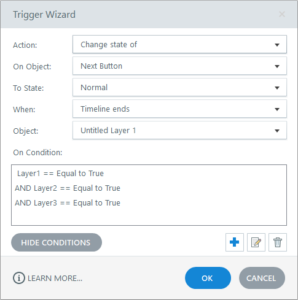
This process prevents the learner from advancing to the next slide until the current slide’s layers have all been visited.
Now repeat this similar process for each slide in the course that has layers. That’s all there is to it!
Restricting Navigation: Use When Warranted
While locking down the user navigation throughout a course is certainly not something we recommend for every situation, there are definitely instances where many people feel it’s warranted. In these cases, you can use the steps in these 2 articles to achieve full or partial lockdown, even when you want the look of a custom course menu.