Whenever we work with a new client to develop eLearning courses, one of our topics of discussion includes what level of freedom they want their learners to have navigating the course.
Is the learner able to skip around and visit any part of the course in any order? Or should the navigation require them to visit each topic in order, and only advance after the previous topic has been viewed in its entirety?
A lot of factors go into that decision. In many cases, when dealing with certifications, compliance, or safety training, clients choose to restrict the navigation to ensure all the content is viewed, and that it’s viewed in the intended sequence. Today, we’re going to focus on how to accomplish partially restricting navigation, specifically using Articulate Storyline .
Process for Partially Restricting Navigation
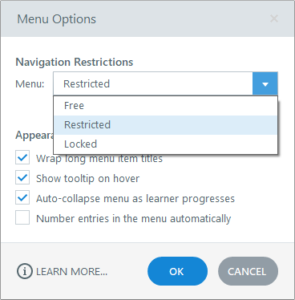
This is easy to do if you’re going to use the standard menu included within Storyline. There are settings for this that make restricting navigation within the menu as easy as a couple clicks.
But if you want your menu to have the same look and feel as the rest of your course, or if you only want the menu accessible at certain times, you’ll find yourself creating a custom menu. Doing so also means you’ll need to do some custom programming in order to restrict the navigation. This is accomplished using variables and triggers.
There are many ways to customize the navigation, and there are certainly different degrees of restriction. Today, we’re going to go over step-by-step instruction for an example of partially restricting navigation. We’ve also included the source file showing how it’s done, because sometimes viewing the source file is just easier!
Partial Restriction
In this example, the learner must at least click through each slide of a menu topic prior to gaining access to the next menu topic. This solution does not require the learner to sit through the entire length of each slide. We’ll cover that in a future posting.
Create Menu Slide
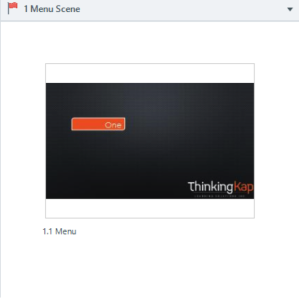
- Create a Scene with one slide to serve as your menu
- Decide what the names of all of your menu topics will be
- Create the object you’ll use for the first topic. This is basically where you determine the look & feel of your menu.
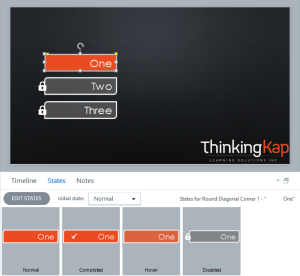
- Create Normal, Hover, Disabled, and Completed states for this menu topic

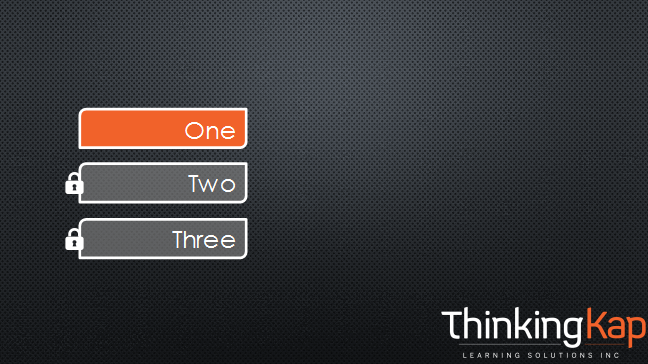
- Copy/paste the menu topic as many times as the number of menu topics you have for this course, add the topic name to each object, and change the initial state to all but the first topic to Disabled. The first topic should remain in the Normal state. This gives the learner access to the first menu topic, but prevents them from accessing other menu topics.
Add Variables to Track Progress
Now let’s add some variables that will be used to track the user’s progress. Create a variable for each menu topic with an initial value of False. Make sure the variable name resembles the menu topic it relates to for easy identification.
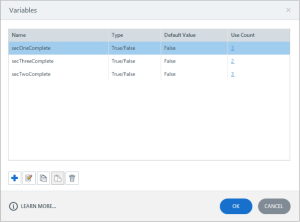
For the rest of this article, we’ll call these “Completion Variables” as we proceed with the rest of the setup. These Completion Variables will be used to track when a user completes a section and thus, controls the topics accessible from the menu.
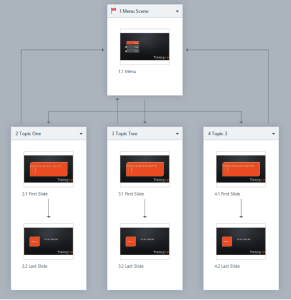
Create Course Structure
Now that we have the initial building blocks of the menu, let’s create the basic structure for the rest of our course.
Create a new scene and at least the first & last slides needed for each menu topic. This framework allows us to add the appropriate triggers and navigation.
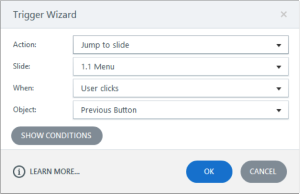
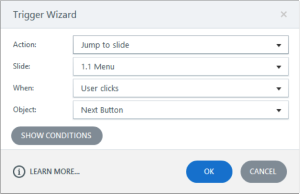
- Add a trigger to the first slide of each scene to take the user back to the Menu slide when the Previous button is clicked.
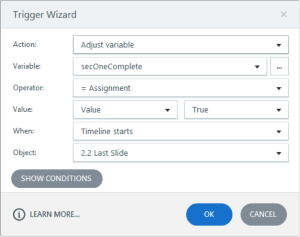
- Add two triggers to the last slide of each scene:
- Change this menu topic’s Completion Variable to true when the timeline starts. We’ll use this to unlock the next menu topic and show this topic as completed.
- Have the Next button take the user back to the Menu slide (assuming you want the user to visit the menu as a progress indicator after each section).
Add Triggers to the Menu Topics
Now, return to the Menu slide so we can put in the triggers needed to make this magic happen.
IMPORTANT: Sequence counts, so make sure in the Triggers panel that the following triggers are in the order specified below.
- Do not add any triggers to the first menu topic.
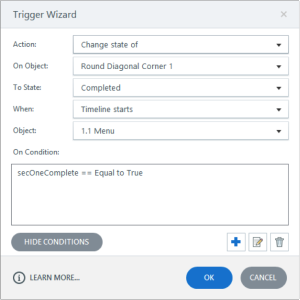
- For all other menu topics, add triggers to change the state of each menu topic to Normal, when Timeline starts, if the previous menu topic’s Completion Variable is equal to true. That was a mouthful! In other words, make menu topic two available when menu topic one has been completed. This unlocks the menu topics one at a time, after the learner has viewed all slides for the previous topic.

- Now, add triggers to change the state of each menu topic to Completed when timeline starts if its Completion Variable is equal to true. This visibly lets the learner know they’ve completed that topic.
At this point, we have the triggers to change the states of the topics and allow users to click them or not, but we still need to make them navigate to the correct slide. So, for each topic, create a trigger to take the user to the first slide of the correct scene when they click the corresponding menu topic.
Phew, that’s it! You now have a custom menu that forces users to proceed through your course in order. Upon returning to the menu, users can easily see which topics they have completed, which ones are accessible, and how many they have left to go.
Partially Restricting Navigation: Use When Necessary
While restricting the user navigation through a course is certainly not something we recommend for every situation, there are definitely instances where many clients feel it’s warranted.
In these cases, you can use the steps above to achieve partial restriction, even when you want the look of a custom course menu. In a future post, we’ll talk about how to fully restrict the navigation so that the learner must visit every slide, every layer, and listen to all audio.